Sunday, November 16, 2008
Scissors beats steam engine
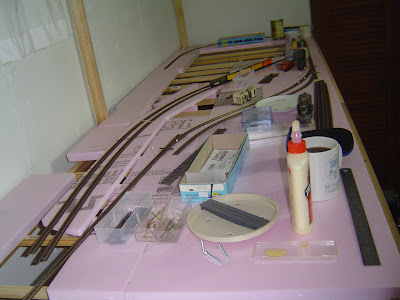
No matter how slowly and carefully I try, I can't get the big steamer through the crossover at the yard throat. The geometry's too tight for the steamer's long, rigid wheelbase.
This is serious.
I haunted e-bay for weeks to get that crossover at a good price, but if the line's flagship steamer can't get through it, it has to go, no matter how much it hurts to tear it up.
Scissors beats steam engine
To lay the track for the new crossover, I'm going to try soldering rails to PCB ties.
I have no local source for these ties, and I wanted to get started right away, so I drove down to Radio Shack and found they had 4x5 sheets of undrilled PCB, so I took one home and cut it up with a hand saw.
This is a lot more trouble than it's worth, believe me, and the cost is about the same. I got thirty-one ties for my five-dollar investment. Fastrax will sell me one-hundred ties for eighteen bucks and save me the trouble of cutting them up. The won't be this long, but now that I've got all the long ones I need, I don't care.
Sunday, August 10, 2008
A Control Panel for the LoCo
I thought it might take all of an hour to cobble together this control panel. The cover is a recycled shelf I built years ago, the angle braces were cut off the ends of cedar I found in the scrap box, and the underside is a piece of MDB left over from another project. It was all nearly ready-made; how could it possibly take longer than an hour to put together? I figured I'd be playing with trains all afternoon.
It didn't take an hour. It took four. I still don't know how.
But it's all together now except for the soldering. The flip-top makes it much easier to get at the electrical components than when they were all hidden under the bench top and I had to crawl underneath to get at them. I'm still not happy with the bracket for hanging the hand-held, but that's something I can improve later. It works for now.
Sunday, June 29, 2008
Today's Project
The paint shop after further upgrade.
A bathroom exhaust fan draws air into the booth and out the back. A few layers of t-shirt cotton stretched over an old picture frame will be fixed against the hole to filter paint from the air.
I still have to cut out a pane of plexiglass to tack over the upper half of the paint box opening.
Switching maneuvers
Today's project: Upgrade the paint shop.
The Paasche air compressor was a lucky find at an estate sale. I think I got it for less than ten bucks.
I've played around with it and an air brush I bought on e-bay but what I really wanted was a switched plug for it and an exhaust fan. Today's project was to wire the switch and plug.
The shelf they're mounted on is just off the floor under the spray booth that's built into the work bench above it. The hose for the air brush will easily reach the front of the booth.
Sunday, June 8, 2008
The End's In Sight
A rainy day, combined with a recent payday, gave me the time and resources to stay in the basement and lay roadbed in the terminal yard.
I'm spreading a bead of an inexpensive acrylic caulk that works well to glue down the roadbed. It starts out white but dries clear, an improvement over the brownish caulk I was using before.
After the roadbed was laid, I spread spackle between the cork to fill in the yard. I'd highly recommend it over laying a wide sheet of cork. The spackle's easy to spread, fills in completely and is easily repairable.
Sunday, April 27, 2008
After sawing off the roof I had to square off the top edge of the walls. I suppose there's an easy way to do that, but I did it by cutting the walls apart at the corners, then pressing them against a sheet of sandpaper and gently sanding away the bumps until I had a smooth edge. When the top edges both looked nice and straight, I got ready to glue them back to the floor ...
But first, I cut away a thick plastic flange along either side of the floor that used to help hold the shell on. Didn't need that any longer. I also cut a piece of sheet styrene and glued that over the floor to make for a clean, flat working surface.
Finally, I glued the sides back in place. When I checked this morning, the glue had set up firm and tight.
I didn't have enough time to day to do much more than think about how I wanted to arrange the interior, although I did cut and paste together some card paper strips to rough out the rooms I wanted.
Saturday, April 26, 2008
Today the chief engineer was scheduled to oversee some tracklaying, but something else caught his eye: an observation car at a bargain price! Just the kind of rolling stock the chief had in mind for his personal business car.
Almost none of the passenger cars on the LoCo have interiors because they're nearly all bargain-shelf Athearn models -- not that there's anything wrong with them. On the contrary, at the prices commanded by commercially-available finished models, there wouldn't be but a tiny handful of rolling stock on the roster if it weren't for the bare-bones models from Athearn, which the management of the Lost Continent Railway finds perfectly presentable.
The body shop at Dog Water Flowage is still under repair after its nearly total destruction in a conflagration triggered by a short in the heating element of an unauthorized distillery hidden under the floorboards, so the chief engineer began to assemble the car on his own, normally a very quick and easy task of screwing the wheel trucks to the floor, then the weights. Windows snap into the openings and a few extra bits of detail like the brake wheel and the railing around the observation platform would finish the car in just a few minutes.
But the head end of the car has no bulkhead for the vestibule, so the chief cut one from a piece of .020 polystyrene using the rear bulkhead as a pattern, carefully tracing the windows for a doorway and cementing it to the sides with some scrap styrene strip.
"That was pretty easy," the chief thought, wondering how long it would take to add a couple rooms and a side passage. The trick, he realized after eyeballing the job, was that the sides and roof of Athearn cars are cast as a shell that clips over the floor. It would be much easier if the roof came off. How difficult could that be?
Only one way to find out.
I started the job of trying to cut the roof off by carefully scoring just under the rivet line with an X-acto knife. After about five passes I began to understand why modelers go straight for their Dremel tools when they start a kit bash like this one.
Still, I was hesitant because I knew a cut-off wheel would melt the plastic even at the Dremel's slowest speed, so I practiced a bit by cutting the roof off an old Tyco caboose, and the results were promising enough to let me dare to move on to the observation car.
It's nearly impossible to make a straight cut, and the burr of melted plastic makes the cut look like hell, but I took my time, kept at it, and found it doesn't turn out nearly as bad as it first looks once the burr is carefully scraped away.
Cutting with the Dremel tool revealed what the X-acto knife only began to hint at: These models are made with plastic so thick it could deflect bullets! Battleships don't have armor plating this thick! Even after going all the way around the roof with the Dremel's cut-off wheel I had to use a utility knife to finish cutting through the thickest parts of the plastic.
With the roof finally sawn off, the job of building up the interior begins to look much more conceivable than before.
Before I begin on the interior, however, there's just a little more work with the Dremel tool to do: I'll have to saw off the head end of the car so I can lay the sides out flat on the work bench. That way I can square off the upper edges of the sides so the roof will sit flat on them.
After the sides are squared off, I can glue the bulkheads again, then glue the whole kit and kaboodle to the floor
Sunday, April 13, 2008
Spotting cars
The track gangs have finished laying two more switches in the terminal yard of the grand central station yet to be named.
As a test of their proficiency, the chief engineer has spent the afternoon spotting a few spare cars on the spurs. He declared the ride through the switches to be so smooth that the first round of drinks at the Thirsty Camel are on him.
His announcement was met with three cheers, and the track gang carried him off on their shoulders, leaving these cars littering the yards.
More of the track gang's handiwork; these three spurs will serve the commissary yards at Hollow Leg. There's a nasty kink in the outside curve at the far left that the chief engineer hasn't found yet, and Dominic Fraboni, boss of the track gang, aims to keep him ignorant of it.
Compare this photo with a shot of the same ground back in December. The work is coming along slowly, but it's coming along just the same.
Gone Round The Bend
The chief engineer takes a two-car special for a spin around a newly-completed stretch of track along the main line up to the terminal throat. The crossover switches haven't been wired for operation yet, so he backs the special through the s-turn and stops for the photographer.
Payday! And the chief engineer had some money left over for track and roadbed, so tracklaying into the terminal yard continued this weekend with the inbound main track and two spurs graded past the switches.
Here, the track laying gang uses a row of books to hold a switch in place while the glue dries.
Monday, March 31, 2008
Bringing the cars in
By Sunday night the grade leading through the terminal throat, and to the switches along the south side of the terminal yard, had been leveled and made ready for track.
"There's no frigate like a book to take us lands away ..." A row of heavy, hard-backed books holds track in place as the glue dries. Standing them up allows air to circulate and the glue to set more quickly.
The track gangs have finished laying the switches into the southern terminal yard and a pair of cars, one standard diner and a heavyweight baggage, are used to find the hairy spots through the crossover.
Sunday, March 30, 2008
Tracking progress
The LoCo track gangs have been hard at work through the weekend preparing the grade for these switches that will bring traffic in to the road's Central Terminal.
With the road bed laid and the right of way readied, only the track is needed. Unfortunately the chief engineer has run up against a shortage, so the track gangs may be shifted to routine maintenance on another stretch of the line.
Using the T.L.A.R. method to line up switches.
(That Looks About Right)
Wednesday, March 26, 2008
May I See Your Pass?
Trouble on the LoCo RR yesterday when the chief engineer's private car tried to squeak past a two-car limited waiting on the other track.
It seems the track gang wasn't paying close enough attention to the specs when they surveyed this portion of of the road and, as a result, laid the two tracks a tad bit close to one another. There is every reason to believe that alcohol might have been involved.
A board convened to look into the matter, but in the meantime the corner of the baggage car will have to be carefully pried away from the chief engineer's car, which in turn will spend the weekend in the body & paint shop at nearby Dogwater Flowage. The chief engineer is anything but happy as he and some of the boys were going to watch the game on the big flat-screen he recently installed in the car's spacious parlor.
He's a teensy bit irked about the track geometry, too, and has already begun plans to tear up this corner and tighten the bend just enough to open up the clearance between cars. The stretch of track should be open again by Monday morning.
Sunday, March 16, 2008
On the road again
I finally bagged a couple of #5 switches in an e-bay auction. They're a lot harder to find that I would have thought. Lots of people post #4's and #6's but hardly ever a #5. For all the time I've put into waiting for one, I probably would've come out ahead just buying it new.
The #5 came in the mail last week, so this is the first weekend I've had a whole afternoon to myself to plot the geometries needed to make the turnoff into the commissary yards in the foreground.
I carefully pinned down the cork roadbed to use as a guide, traced it with a china marker, then spread caulk adhesive in the outlines with a putty knife. The caulk has a high enough tack to hold the cork in place without making me pin it again.
Besides laying out the commissary yards I ran the other end of the roadbed a little further toward the future site of the terminal.
Sunday, February 3, 2008
On the Bench
It's built mostly of scraps, but it's beginning to look a little like the hobby bench I've pictured in my mind's eye when I started almost two years ago.
I had enough scrap wood to extend the table top and found a bit of peg board in the back of the work shop that was just the right size. After a trip to the hardware store this afternoon I'll be able to hang some tools up and finally clear away some of the clutter on the bench top.
Sunday, January 20, 2008
Paving the road
Sunday, January 6, 2008
The LoCoRR, Lower Level, Smaller Scale
Tearing up the N-scale tracks got me thinking about the second, unused level of the bench work, and now that I had the knack of putting it together I knew it would take just an afternoon or two to get it fixed up.
This is the result of two afternoons of cutting and gluing. I still have to cut a piece of hardboard to cover the second half. I'll do the same with the lower level off to the right eventually, but this will do for now, just to get things started.
Saturday, January 5, 2008
Now you see it ...
Subscribe to:
Posts (Atom)