Thursday, December 27, 2007

Bridgebuilding continues

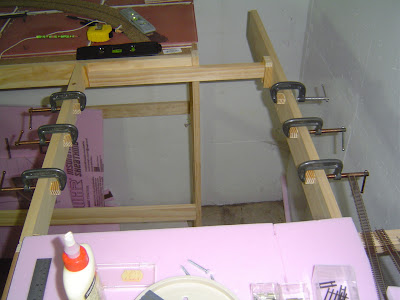
The kludge goes on as I bridge the gap between the two-foot extension (in the background) and the original bench work (in the extreme foreground).


The approach is straightforward and, for once, no screws or power drills have been used. All the pieces are glued into place.

Wednesday, December 26, 2007

A Boxing Day Update

One of the steamers poses for a photo on newly-laid track.

Clearances are a bit close, but still the long passengers cars manage to slip past one another.

Today's impulse bade me work on the long-overdue bridge so the yard throat can cross to the main bench. Track will come round the curve on the extension along the wall to the bench in the foreground where the as-yet notional terminal will be built.


The bridge is a kludge like the rest of the bench work, but it's turned out okay in spite of my questionable abilities as a carpenter.

Sunday, December 23, 2007

Laying Track on the LoCo

I still use carpenter's glue to fix the tracks to the roadbed ...

... and utilize the most high-tech methods at my disposal to spread it evenly, ensuring a high tack and consistent adhesion.

Track fixed to the roadbed and pinned into 24" S-curves, the approach to the yard throat and the station.

Back On Track


After a lapse of about nine weeks, for no reason other than I was pursuing other interests, I found myself with a few hours alone in the basement and satisfied the urge, which came out of nowhere, to lay down some cork roadbed and, just maybe, if I have enough time today, some track, too, although I don't want to get ahead of myself at this point.

I've always used white glue as an adhesive to fasted the roadbed before this but today I used an adhesive caulk, mostly because it was handy but also because I'd read that it was better than white glue. And it is, inasmuch as it's got enough tack to hold the cork in place that I don't have to pin it, although I did pin the ends to keep them bent around the curves.

Sunday, October 14, 2007

I'm so tiled


I topped off the bench work with a layer of medium-density board, and covered it with a layer of acoustic tiles. If this doesn't make for a quiet-running layout, screw it. At this point, I'm committed to laying track.

I spray-painted the tiles with some red primer (Number Two Son says it's pink; whatever) because they were so white it hurt my eyes. I wanted some kind of undercoat to make landscaping easier. The cap on the spray can looked like a dirty brown and it was cheap. So it's a salmon color. Oh, well.

I fixed the tiles to the MDB with a tube of latex adhesive caulk. There was just enough in the one tube to lay it on thick. After the tiles were all laid down, I spackled the joints to leave a more-or-less level surface, then walked away for the rest of the day to let it dry.

Later in the day, I finally won an e-bay auction for a Shinohara double crossover after stalking the auctions for three weeks. With any luck at all I'll be laying track before next weekend.

Sunday, September 30, 2007

Nap Time


Foam pulled up.

Stingers knocked out, re-installed at a height more conducive to straight and level running.

Hardboard and ceiling tiles fetched from hardware store.

One more sheet of hardboard fetched from hardware store because you can't go there just once and expect to get everything.

Ceiling tile pieced together experimentally, cut to fit special locations, set in place (nothing glued down yet -- got to think about this a bit).

I need rest.

Fixer-Upper

The resale on this chunk of benchwork is effectively nil, due in large part to the fact that I change my mind about the layout more often than I change my underwear, the result of which is that it's as irregular as a three-dollar bill.

Just for example, the leg of the benchwork that I refer to as the "three-foot extension" is in fact thirty-seven and three-quarters inches wide. Try to find a piece of stock hardboard to fit that. The layout's been through so many permutations that I have no idea anymore how it ended up this wide.


Here's another excellent example: It may not be obvious from this photo, but when you eyeball it face-to-face, as it were, you can plainly see that the stringers supporting the foam board on the left are obviously higher than the stringers on the right. They are, in fact, almost three-quarters of an inch higher.

I know how I did that, but I'm too embarrassed to explain it right now.

Today's project: Begin to fix these screw-ups. There's no way I can adjust the width of the three-foot extension now, but I can pull out and lower the stringers, which I'll have to do to execute my next fix: Replacing the foam board top.

An article in Model Railroader led me to believe I could lay track directly on the foam board, which could be laid directly on the bench work. Which is factually true: I really could very easily do that, but when I ran a couple locomotives across the track to see them go, every one of them made enough noise to stampede a herd of longhorns. It damn near stampeded me.

So I'm going to put an old-fashioned layer of hardboard across the stringers and an old-fashioned layer of ceiling tiles over that, then lay track on a cork road bed, just as I should have done from the beginning.
Sunday, September 23, 2007

Missing Man


The hobby bench has been dark this past week. I've been a little under the weather.

Saturday, September 15, 2007

A Painting Primer

To give the first coat of cream a bit more strength, I thought I'd try a primer coat of white, applied around the windows of this coach. The results below: one coat on the right, two in the middle, three on the left. I honestly couldn't tell you if the game was worth the candle.

Here's one weird thing about painting this particular coach: I ran across a patch of plastic where the acrylic paint turned instantly to sludge as I applied it, making a smooth, even coat impossible. I scraped it off and tried again with the same result. I've never seen a reaction like this, but then I've never used acrylic paints on plastic models before.

Sunday, September 9, 2007

Given the slip, part 2

Taking a deep breath, I fluxed the first two or three ties, held the outside rail down with a probe and soldered it in place. A quick poke with the probe confirmed it was held fast, and I could see it wasn't a cold joint. Flush with success, I pressed on. Flux, solder repeat.


I filed useless angles into the ends of three rails freehand before I got the idea to cut a jig to hold the rail an the correct angle. All I have to do is concentrate on holding the file straight.

My first frog.


The soldering work is more than a little messy because I've never seen this done before and am working out the kinks as I go.

For instance, I knew that the two kinds of solder I had in my tool box melted at different temperatures, but I had no idea why that was significant until I tried to carry a bead of solder to the rail while the iron was too hot for it. The low-temp solder falls off a hot iron; the high-temp solder sticks to it like cookie crumbs to a toddler's face. And I figured that out how? I grabbed the high-temp solder by mistake.

Saturday, September 8, 2007

Given the slip, part 1

About seven or eight years ago, I bought a kit from a vendor at a train show for a double-slip switch, and it's rattled around in the bottom of a tool box ever since. This week, I finally get around to giving it a shot.

The ties are made of PCB strip that must be cut to length, which I marked with a chisel. The kit was made by Scaleway, a UK company, but the template is downloaded from the Fast Tracks web site.

Then on to the tedious job of hacking all those ties up. An easily-made cutting board with a fence gave me a stable work surface that held the PCB so I could saw through it in one stroke, speeding the task up quite a bit.

Once all the ties are cut, I smeared the template, protected by a layer of packing tape, with white glue and pressed the ties into place.

... then set it aside to let it dry.

Next: Cutting and filing the rails.

Friday, September 7, 2007

Tim Warris' Bronx Terminal

Tim Warris is modeling the Bronx Terminal. I ran across his web page while I was searching for tips and how-to's on laying track by soldering them to PCB ties, a technique I'm trying to earn. Warris is using the same technique to model the terminal's intricate track plan, and he started with what looks like the most insanely complicated triple-lapped turnout ever conceived. He even modeled it in N-scale just for display!

If you go, be sure to click on the link to take you to the earliest post. You won't be disappointed.

Wednesday, September 5, 2007

Putting My College Education to Work


Yours truly holds a bachelor's degree in the liberal arts, and of the electives I took to earn that sheepskin, several involved dirtying card paper with acrylic paint.

Now, decades later, I was faced with the problem: How do I paint the roof of this RPO when the commercially-produced Tamiya paint I bought for the job sucks? (It really does. Don't waste your money.)

As it happened, my tool box held several tubes of acrylic paint I bought from an art shop to paint some signs, probably for a garage sale, and there was still more than enough Mars black to see if I could still remember how to mix paint with water.

You know what? This stuff is leagues better than bottled paint, and a teensy dab goes a long, long way. Fussing with getting the right mix of paint to water is hardly any trouble at all, and even rewarding when it comes out just exactly right.

Of course, it's pretty easy for me to brag when I'm using black straight out of the tube. I'd probably be a frustrated wreck sucking on a bottle of grain alcohol in a dark corner if I'd tried to mix maroon on my quaint little tea saucer.

It's my first baby step.

Sunday, September 2, 2007


Switches are a perfect example of how I suck at track planning.

I drew the curve, then the tangent, and measured the divergent angle. It's a #6 turnout. If I place my Shinohara #6 turnout over the sketch with the frog at the tangent point, it looks like it ought to be a number six. But if I connect the flex track to the switch and try to make it fit, there's no way.

I haven't the slightest idea how to figure out what number switch I'll need without physically owning the switch, connecting it to flex track, and laying it on the bench. Then, and only then, will I have a solid idea what number I'll need to make everything fit. It's the Lionel method of track planning: Piece it together until you find what works.

Saturday, September 1, 2007

Turn, Baby, Turn!

A four-coupled Niagara can just barely squeak through this turn, which is so tight the main drivers of the engine are pressed to the absolute limits of their considerable side-to-side movement. At the tightest point of the curve, the driving rods thunk-thunk-thunk with each revolution of the wheels against the plastic body as the engine crawls along.


I tweaked this curve quite a bit trying to make a Shinohara switch with a #6 frog fit the curve, but it's simply not going to work. It needs at least a #5, or more probably a #4. To find out which will work best, I'll rip the track up, draw a curve with a 24" radius and measure the divergent route.

The plan called for a 24" radius in the first place. Moral: Develop a plan, then stick to it!

Wednesday, August 29, 2007

Slow and Steady ...


... a few more squares of foam pared to fit around corners and against each other ... glued to the stretchers and held until morning by carefully balanced stacks of books ... track soldered together into nine-foot segments ...

Tuesday, August 28, 2007

Scotty! Give Me All You've Got!


"That's every book in the ship's library, cap'n! I cannae gi' nae more!"

You can own every work bench gimmick made, and when it comes to holding a sheet of foam down flat against glue-slathered wood runners, nothing will do the trick like stacks and stacks of heavy books.

Tonight's sixty-minute trip on the Lo Co combined some bench work with painting. After scrounging around for a half-hour or so I managed to piece together enough blocks of pink foam to provide a base for the track work. When I was reasonably sure it was laid out in the pattern I needed for the notional track plan I had worked out, I marked the positions of the pieces, moved it all away, squirted a little glue across the supports and voila! The mess you see here.

And I painted a dining car and an RPO. Photos to follow.

Monday, August 27, 2007

Not Much, How About You?

Eked out just a half-hour tonight to do a little painting, a second coat to the cream color along the top of a diner car. No photo, barely enough time to get the brush wet as it was, but I wanted to get back on that bike after a weekend spent running off to a bed & breakfast with My Darling B to celebrate our wedding anniversary. I didn't ask, but I had the feeling she might have objected if I'd taken a model and a jar of paint along.

On Sunday my time was entirely claimed by yard work, now that the midwest seems to have won a reprieve from the never-ending rain, which naturally means that I was propped up on the sofa in limp dishrag mode Sunday night, unwilling and very possibly unable to lift a paint brush.

But I'm back! to trying to visit the work bench every night and keep the Lost Continent Railway alive.

Friday, August 24, 2007

In The Beginning Was The Plan


Just Kidding. I don't have a plan at all, and never have. What I have would more properly be called a "hope," or even a "wish." I've never been good at drawing up track plans. When I see the plans other people have drawn for their pikes, I weep for want of ever conjuring up anything nearly that imaginative and detailed.

That's my track plan, such as it is, in the foreground. It's a sketch drawn mostly freehand on a crude grid, and it's about as detailed as the crude sketch drawn with a pen on the foam board laid out across the bench work.

I've read all the John Armstrong articles in every issue of Model Railroader from 1950 to 1969. Fascinating stuff. And I can easily see how important a well-thought-out plan is to the success of an operating layout.

I learned to plan a layout by piecing together six-inch lengths of Lionel 3-rail track, though, and I don't seem to be able to get any more sophisticated than that, unless I'm allowed to count using flex-track and a soldering iron.

So this is how it starts: A crude sketch, first on paper, then on foam. Eventually I start playing with the track to see if I can match it up to the sketch. We'll see.

Thursday, August 23, 2007

Stirred, Not Shaken


I used to shake all my paints to mix them up, but They say you're not supposed to do that because of the air bubbles. That doesn't bother me as much as the clotted crud that builds up on the lid and inside the neck of the bottle.

They say you're supposed to stir your paints. I tried that, but never did find a tool that would thoroughly mix the paint up with the solvent.

As I sat down to paint one night I thought, You know, I stirred it up just last night so it shouldn't have separated all that much, and I gave it a little swirl like this. Mixed it up just fine, so I thought I'd share this little tip with you.

Wednesday, August 22, 2007

Just Like Starting Over

Daunted. That's the way I always feel when I start painting a car body. I know that after a few nights of persistent painting it'll shape up nicely, but that first coat looks so mousy, no matter what color it is or the method I use to apply it. I'm grateful the camera can't clearly see how both the cream and the maroon look thin and runny, as though I wasn't even trying.

I sprayed the cream on (see previous post), but I probably won't use the airbrush again on this model, mostly because I don't have the time tonight to clean it up, and especially not to mask off the parts where I don't want any more cream color. Besides, I want to hold a real brush. There'll be plenty of opportunities later to try masking for a complete airbrush job.

The work is slow, particularly where I have to use the point of the brush to mark off the boundary between the maroon and the cream. There's a line of rivets there as big as soft balls, but if I methodically pace myself the results are gratifying as well as relaxing, believe it or not.

Dig the grampa glasses. Fifteen dollars at Walgreen's. It's the only way I can focus on the details so as not to slop paint where it's not wanted. I've got one of those hooded things that goes over my head with the thick lenses, but I never could adjust the band so they'd stay on when I turned my head, and they're so uncomfortable I've used them only a handful of times. Reading glasses are the bomb.

Tuesday, August 21, 2007

Let Us Spray


As much as I hate cleaning the furshluginner thing, there's nothing that matches an air brush for sheer speed. I put a first coat on these two cars in less than the time it took to write two quick sentences about it.

But the second coat went on with a brush, because it's better that way. The first coat can go on any old way, but I need more control after that, and a brush is the only way to paint that makes me feel as though I'm in control. The air brush blasts paint all over the place, as you can see, unless I mask off the rest of the car body. Athearn molded these cars with rivets that stick out about six scale inches, though, which makes masking a bit of a problem, and I'm still trying to work it out.

If it seems as though I'm spending a lot of time painting, it's because I'm trying to decide on a scale. This makes a little bit of sense, so please bear with me.

I conceived of the Lost Continent Railway as an N-scale layout. I even laid a respectable amount of track for it, but when I began to paint the rolling stock I realized that there was no way I was made to work in that scale. Maybe I could have at one time, but now I'm wearing the strongest reading glasses available at the drug store for the up-close work, and they're not helping all that much in N.

In HO I feel I can actually see what I'm doing. I can get my hands around the car body and hold it still. The brush isn't as big as a vestibule door. Painting the larger cars takes longer, but satisfaction is up.

I'd love to try working in O, but we don't have enough room in our basement to give up for a layout in 1:48 (not that I have a layout now). I dabbled briefly with the idea of building in S, but my research showed me that the available rolling stock, track and building kits are priced far outside my budget. HO is at my upper limit of affordability, habitability and visibility.

But what to do with all that N-scale equipment?

Monday, August 20, 2007

Transformations


The "decorated" dining car as delivered by Athearn, and a diner in the livery, sort of, of the Lost Continent Railway. The "decoration" on the upper car consists entirely of the words "New York Central," "Dining Car" and other gold lettering. There's not a spot of paint anywhere on it, not even the roof. Conversely, there isn't a single letter anywhere on the painted car. I haven't worked out how I'm going to do that, yet.

The decorated car has had three or four coats of cream, I forget exactly, and one coat of maroon over an old coat of lighter, glossy maroon. Oddly, both the old and new coat are both supposed to be "Milwaukee Road Maroon" but aren't even close, unless you squint, and turn off the lights. The cream color is what makes the livery good-looking, if you ask me, but I love to say "maroon" so much more than "cream."

Sunday, August 19, 2007

A Day Behind The Paint Brush


Like all barbarians, I still paint my rolling stock with a brush. It's an especially ironic choice given that brushing on several coats takes hours, while the reason I don't like to use an airbrush (I have three different kinds) is all the time spent cleaning them out, not to mention that fiddling with masking tape frustrates the hell out of me.

The first coat is usually so discouragingly thin it makes me want to chuck all my paints and find a very simple hobby I might be good at, such as picking my nose or counting my fingers. It's particularly disheartening when I'm applying a light color on a dark background, just about all the time at my work bench because of all the cream in the livery of the LoCoRwy.

After applying just one more coat, applied just an hour or so after the first, the results are encouraging enough that I feel good about moving on.

Saturday, August 18, 2007

An Expanding Universe


It was a rainy day today, so I went downstairs to frown at the nonlayout, my kludge of three cobbled-together benches standing in a loose u-shaped formation. How sad, I thought, that I didn’t have the forethought to make this bigger from the start. Expanding it now would be a real bitch. I went ahead and moved things around to start expanding it anyway.

The two-foot extension went against the wall, about two feet away from the original bench and roughly twelve inches to the left. I left the three-foot island attached as planned, forming an L-shaped island. Now that it’s further from the original bench, there’s more aisle space. I’ll just have to dink around with some kind of extension to joing the two together, but as I mentioned before, it’s a kludge already, so what the heck.

Then I made a run to Menard’s and came back with twenty-four feet of pine cleating and cut it up for stringers, which I spent the rest of the afternoon gluing up in the three-foot island to finish off the bench work.